


Google Authorship has certainly made the search results more interesting than before. It has become simple for the users to choose their links on the basis of the rich snippet that come along with the links in the search results. Google authorship or rich snippet is nothing but the image of the author that comes along with the search result. For example:
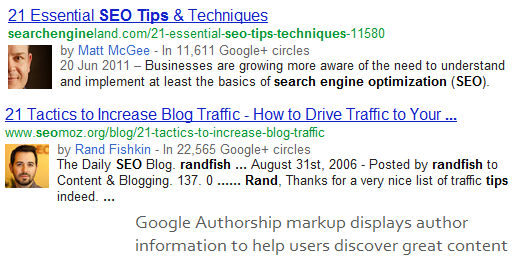
Now working as an SEO for a good period of time, whenever I search for some related topic, it becomes easier for me to select authentic links since they are displayed along with the author name and his/her profile. So the next time I search something related to search engine on page optimization or search engine off page optimization, it becomes easier for me to select posts from Matt Cutts, Neil Patel, Matt McGee, Rand Fishkin or other such well-known writers.
Have you ever wondered how these images get displayed? Are you an author of some website and also want your image to be displayed along with your website? If yes, then below is a detailed guide to setup your Google authorship which will definitely help you in increasing your traffic drastically.
Google Authorship Setup Procedure
There are two ways by which you can setup your Google Authorship. However, to use any of these methods, you have to have your own Google + account. Once you are done with setting up your Google + account, any of the following two procedures will help you in getting the rich snippet.
#1 Using Your Professional Email
If you have an email with the same domain for which you are writing for, the below steps would help you in setting up your authorship. If you do not have a professional mail id, Step #2 will help you.
- Check that you have an email id (for eg: manas@techdroll.com) on the same domain (techdroll.com) for which you are an author
- Ensure that each article on this domain has a byline identifying you as an author. An byline is usually the author name or author bio at the end of the article
- Visit the Authorship Page and submit your professional mail id
- After submission of your professional mail id, you will receive a verification email. Verify your mail id
- After successful verification of your email, the domain name will appear in the contributors list of your Google+ profile
#2 Manually Linking Your Google + Profile with Your Website
This procedure is applicable if you do not have a professional email id. Following are the steps that help you to manually link your Google+ profile with your website for Google Authorship.
- Create a link of your Google+ profile as shown below

- Now replace “[profile_url]” with your Google+ profile URL as shown below

- Now insert this link after every article you post on your website
- Once done with this go to your Google+ profile and open the Contributors section on the right bottom of your profile
- Edit the Contributors To section and click Add Custom Link
- Enter your website URL here and click save
- Your Google Authorship setup is done
Google Authorship is definitely an easiest way to attract huge number of traffic to your website. It has been monitored that the probability of people clicking on links with rich snippet has increased by 150% to that of links without rick snippet. Hence, follow the above mentioned procedures to get your own Google Authorship and increase your website traffic in no time.
If you find the above procedure tedious to understand, here is a detailed infografics/flowchart for setting up your Google Authorship: